_1751731246795-BygAaJJK.png)
Turn a Blog Post into a YouTube Video with ChatGPT and CapCut

 Published by CodeNicely, the product studio founded by Meghal Agrawal and Ujjwal Agrawal in 2017
For: Content manager at a 15-person SaaS company who publishes two blog posts a week but gets almost no video output because there is no dedicated video producer on the team
In this guide
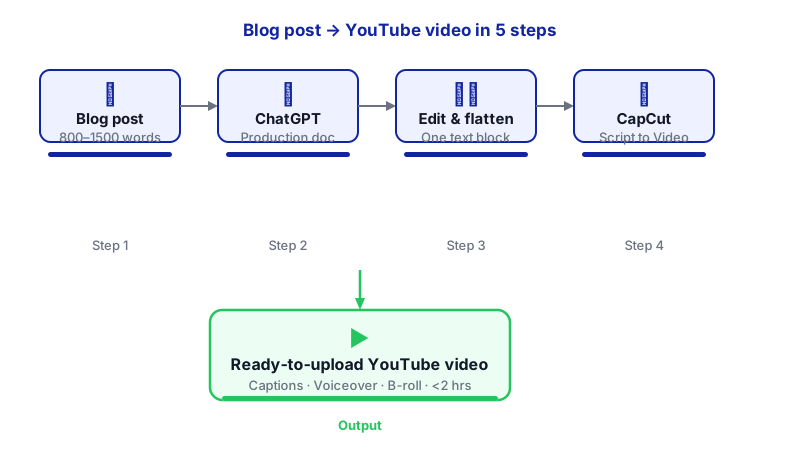
By the end of this tutorial you'll have one of your existing blog posts turned into a ready-to-upload YouTube video — complete with AI voiceover, on-screen captions, and B-roll visuals — in under two hours, using only ChatGPT and CapCut. No camera, no editor, no video team.
Last verified: October 2026, against the tools' own documentation. AI tools change often — if a step no longer matches, check the sources at the end.
Who this is for, and what you'll get
This is for content managers at small SaaS or services teams who already publish written content regularly but have never shipped video because the production overhead feels enormous. If you're writing two blog posts a week and watching them live only on the blog, this workflow unlocks a second channel without hiring anyone.
What you'll end up with: a single horizontal video (roughly 2–5 minutes) built from one blog post, with a scripted voiceover, burned-in captions, B-roll that changes with each scene, and a YouTube title plus description ready to paste into the upload form.
What you need
| Tool | Plan needed | What it does here |
|---|---|---|
| ChatGPT | Any plan that lets you paste in a full blog post and get long replies | Converts your blog into a shot-by-shot production doc, plus the YouTube title and description |
| CapCut (desktop or mobile) | Pro recommended (around $19.99/month or $179.99/year) for auto-captions, 4K export, and watermark-free AI assets. Free works with caveats — see the gotchas section. | Generates the video: scenes, AI voiceover, captions, and B-roll from your script |
CapCut's Script to Video and other AI features are only available in specific regions. CapCut is available in the US, UK, EU, Canada, and Australia as of mid-2026, but is permanently banned in India and restricted in Iran and Pakistan. If you're outside a supported region, this workflow won't run.
Step-by-step
- Pick the right blog post. Choose a post that already performs well on search or email — ideally one that teaches something concrete, has a clear structure (intro, 3–5 points, conclusion), and runs 800–1,500 words. Explainers and how-tos convert to video far better than opinion pieces or news.
- Paste the whole post into ChatGPT and ask for a production doc, not a script. This is the step most tutorials skip. Instead of asking for a "video script," prompt ChatGPT to output a shot-by-shot table where every scene has three things on one line: the voiceover text, the on-screen caption, and a B-roll keyword. That structure is what makes CapCut's Script to Video feature produce coherent visuals in a single pass instead of needing three editing rounds.
You are a YouTube video producer. I'm going to paste a blog post below. Convert it into a shot-by-shot production doc for a 3-minute YouTube video aimed at [your audience, e.g. "founders of 10–50 person SaaS companies"].
Output a table with these columns: Scene #, Voiceover (1–2 spoken sentences, conversational, no jargon), On-screen caption (max 6 words), B-roll keyword (one concrete visual, e.g. "laptop dashboard close-up" not "technology").
Aim for 12–18 scenes total. Open with a hook that states the problem in the first 5 seconds. End with a one-line call to action to [subscribe / read the full post / sign up].
Then, below the table, give me: (1) a YouTube title under 60 characters, (2) a 150-word YouTube description with 3 timestamps, (3) 8 tags.
Here is the blog post:
[paste full post] - Edit the production doc before you touch CapCut. Read the voiceover column out loud. If a sentence trips you, rewrite it. Tighten anything that sounds like a blog subhead rather than a human talking. Check the B-roll keywords — vague words like "business" or "growth" will give you stock-looking filler, while specific phrases like "analytics dashboard with rising line chart" give CapCut a much better shot at a relevant clip.
- Flatten the voiceover column into one block of text. CapCut's Script to Video takes a single pasted script, not a table. Copy just the Voiceover column, top to bottom, into one text block. Keep the paragraph breaks between scenes — they help CapCut split visuals correctly. Save the captions and B-roll keywords in a separate document; you'll use them in step 7.
- Open Script to Video in CapCut. On desktop, you'll find "Script to video" on the CapCut home page. On mobile, tap All tools, then the AI tools section, then Script to video. Paste in your flattened voiceover text.
- Choose a video style and generate. Pick a style that fits your audience — clean and corporate for B2B SaaS, more dynamic for consumer. Tap Generate. CapCut will auto-create scenes, pick B-roll from its library or AI-generate it, add an AI voiceover, and lay in captions. This usually takes a few minutes depending on script length.
- Review the draft and swap weak visuals. Open the generated project in the editor. Scrub through once. Wherever CapCut picked a generic or wrong clip, use your saved B-roll keyword list to search the stock library and replace it. You can also drop in your own uploaded clips — product screen recordings are especially worth adding here, because no AI will generate your actual UI.
- Fix the captions. Auto-captions on Pro will usually be close but not perfect — product names, acronyms, and company names get mangled. Click through each caption and correct spellings. If you're on Free and hit the caption cap, you'll see an upgrade prompt; at that point, either upgrade or manually type the key captions over the voiceover.
- Check the voiceover. If the AI voice mispronounces a brand name, you can usually fix it by respelling phonetically in the voiceover script and regenerating that scene (e.g. write "Notion" as "No-shun" if needed). Re-listen end to end before export.
- Export. On Pro, export at 1080p or 4K. On Free, you'll be capped at 1080p, and if any Pro-tagged element (template, effect, AI clip, sound) is in the project, your export will be watermarked. Check the preview — if there's a watermark, go back and swap out Pro-tagged assets for free ones.
- Upload to YouTube. Paste the title, description, timestamps, and tags that ChatGPT produced in step 2. Upload a thumbnail (you can generate one in CapCut or Canva using a frame grab plus the on-screen caption from your hook scene).
A worked example
Say your blog post is titled "Five Onboarding Mistakes That Kill SaaS Activation." Here's what each layer looks like:
Sample row from the ChatGPT production doc:
| Scene | Voiceover | On-screen caption | B-roll keyword |
|---|---|---|---|
| 3 | "Mistake one: you ask for too much information before the user has seen any value. Every extra form field drops activation by double digits." | Too many form fields | Close-up of long signup form being scrolled on laptop |
What good output looks like after CapCut generates: Scene 3 shows a laptop with a form being scrolled, the AI voiceover reads the two sentences in a steady narrator tone, and the caption "Too many form fields" appears bottom-centre for the full scene. If instead you see a generic office stock shot with people laughing, that's a sign to swap the clip — the keyword was too vague or CapCut's library didn't have a match.
Sample YouTube description ChatGPT returns: A 150-word summary of the five mistakes, three timestamps (0:00 Intro, 0:35 Mistake One, 1:20 Mistake Two…), and a closing line linking back to the full blog post.
Limits and gotchas
- Regional availability. CapCut's own page states Script to Video is "available in specific regions." If you're in India (where CapCut is banned) or Iran or Pakistan (restricted), this workflow won't work. US users should also note CapCut was briefly pulled from app stores on January 19–21, 2025, before being restored.
- Captions on Free. Auto-captions are a Pro feature. Free users hit an undocumented cap and get an upgrade prompt. CapCut doesn't publish the exact free-tier caption limit, so plan to upgrade if you're producing video regularly.
- Watermarks are asset-dependent. A free-plan export is only watermark-free if every element — templates, effects, AI clips, sounds — is non-Pro-tagged. One Pro asset in the project stamps the whole export.
- AI credits. AI generation features are credit-metered on every plan. Pro includes roughly 1,200 AI points per month after the 2026 restructure. Heavy use of text-to-video or AI avatars will burn through credits faster than you expect.
- 4K is Pro only. Free caps at 1080p. Selecting 4K on Free triggers an upgrade prompt immediately.
- Human check. Always review the AI voiceover for mispronunciations of product and company names, and read every caption for spelling. Also check that B-roll doesn't accidentally show a competitor's logo or an off-brand visual.
- Pricing changes. CapCut no longer publicly posts a pricing page. The tiers quoted here (Standard ~$9.99/month, Pro $19.99/month or $179.99/year) reflect the 2026 restructure — check the current price in the app before you subscribe.
- Data. You're pasting your blog content into ChatGPT and your script into CapCut. If the post contains unreleased product details or confidential data, treat it the way you'd treat any other third-party SaaS upload.
When not to use AI for this, and honest alternatives
Skip this workflow when the video needs to feature a real person — founder interviews, customer stories, product demos narrated by your actual PM. AI voiceover and stock B-roll will feel hollow for anything built on trust or personality. For those, record a simple talking-head on a phone and use CapCut just for trimming and captions.
Also skip it for product demos where the whole value is seeing your UI work. In that case, record the screen first, then use ChatGPT only to write the voiceover script and CapCut only to add captions and cut the recording.
If you need high-polish brand video — a homepage hero, a launch film — hire a freelance editor. AI-generated video still looks AI-generated at close inspection, and for flagship assets that matters.
Frequently Asked Questions
Can ChatGPT generate the video itself?
No. ChatGPT produces text — scripts, outlines, titles, descriptions. It cannot render, animate, or export video. That's why this workflow pairs it with CapCut, which handles the actual video generation from the script.
Do I really need the Pro plan?
If you're producing video regularly, yes. The free plan caps auto-captions, limits exports to 1080p, and will watermark any export that contains Pro-tagged assets — and most AI-generated clips are Pro-tagged. For a one-off experiment, Free is fine; for weekly output, Pro removes the friction.
How long does it actually take?
A 3-minute video from an existing blog post, start to upload, typically fits in 90 minutes to two hours once you've done it twice. The first time will take longer because you'll be learning the editor. The ChatGPT step is 5–10 minutes; CapCut generation runs in a few minutes; most of the time goes to reviewing captions and swapping weak B-roll.
Will YouTube penalise AI-generated video?
YouTube's current policy requires disclosure of "altered or synthetic" content that could mislead viewers, but doesn't ban AI-assisted video. For an explainer with AI voiceover and stock B-roll, tick the disclosure box during upload and you're fine. Check YouTube's current creator policies before you publish, as these rules evolve.
Can I batch this across my whole blog archive?
You can run the ChatGPT step in parallel for several posts, but CapCut's Script to Video is a one-project-at-a-time workflow in the editor, and you'll burn through AI credits fast. A realistic cadence is two to four videos a week per person using this process.
When this workflow outgrows off-the-shelf tools — for example, if you want to auto-publish every new blog post as a video on a schedule, or integrate your own product footage automatically — a custom build is an option, and that's the kind of thing CodeNicely does.
Sources & further reading
- CapCut Script to Video Guide: Plan Scenes and Voiceover (capcut.com, Sept 2026)
- AI Script to Video Maker — CapCut official tool page
- Script Magic: Transform Text to Video with CapCut App Script to Video AI (capcut.com)
- Text to Video Using AI — CapCut official tool page (regional availability notice)
- Complete Guide to CapCut AI Features in 2026 — arwriterai.com (Sept 2026 pricing table)
- CapCut Auto Captions Not Free Anymore? Why You're Forced to Upgrade to Pro (2026) — reelvideocaptions.com
- CapCut captions aren't free anymore — Descript blog
- Is CapCut Free? CapCut Free vs Paid in 2026 (What You Pay) — pexo.ai
- How To Export CapCut Without Pro in 2026 — videowizardtools.com
- CapCut Pro Price in 2026: Is the Paid Plan Actually Worth It? — pixflow.net
Get one practical guide a week
Costs, AI tools, partner selection — written for people who make the decision. No spam, unsubscribe anytime.
Thanks — you're on the list. One practical guide a week, nothing else.
That didn't work — please check the email address and try again.
Building something in Video & Content?
CodeNicely partners with founders and tech teams to ship AI-native products that move metrics. Tell us about the problem you're solving.
Talk to our team Book a 30-min call